
写在前面的话
前面已经有文章讲解国如何用nginx做反向代理,实现致远OA的https访问。其中就提到一个大坑需要手工编译sticky模块,对sticky模块前文已经有介绍,这里就不再赘述,本文主要讲解如何通过源码编译的方式实现Ngnix的安装。
注 意
这里需要的操作系统需要是Linux,Windows下是无法实现的,如果需要在windows环境下可以使用apache来做反向代理实现相关功能,这不是本文索要阐述的重点,所以默认读者是在linux下进行操作。支持国产信创操作系统如通信UOS,银河麒麟等。
手搓的步骤详解
一、更新软件源和安装依赖
# Debian及其衍生发行版(如Ubuntu)运行如下命令
sudo apt update -y
sudo apt install wget gcc build-essential patch -y

# RedHat体系(如CentOS)使用yum或dnf作为包管理工具
sudo yum update -y
sudo yum install -y wget gcc make gcc-c++ kernel-devel patch
如果是RedHat体系(如CentOS),openssl-3.3.1编译依赖Perl模块IPC::Cmd,可以使用以下命令通过CPAN安装:
yum install perl-CPAN -y
# 首次使用,会提示初始化配置,默认推荐选择即可,也可以进入CPAN的shell模式安装,perl -MCPAN -e shell 进入shell模式,执行 install IPC/Cmd.pm 安装
cpan IPC::Cmd
二、 下载源码包:
1. 可以到csdn 本帖关联的资源地址下载
手搓Ngnix+Sticky模块实现致远OA反向代理所需的源码资源-CSDN下载
2. 如果网络情况好,可以直接访问github去下载,当然国内非常不建议了
# 将所有源码包下载到 /opt/nginx_src
mkdir -p /opt/nginx_src
cd /opt/nginx_src

# nginx: 1.26.3
wget https://nginx.org/download/nginx-1.26.3.tar.gz -O nginx-1.26.3.tar.gz

# nginx_sticky_module: 1.2.6
wget https://github.com/Refinitiv/nginx-sticky-module-ng/archive/refs/tags/1.2.6.tar.gz  -O nginx-sticky-1.2.6.tar.gz

# pcre: 8.45
wget https://sourceforge.net/projects/pcre/files/pcre/8.45/pcre-8.45.tar.gz/download -O pcre-8.45.tar.gz

# openssl: 3.3.1
wget https://github.com/openssl/openssl/releases/download/openssl-3.3.1/openssl-3.3.1.tar.gz -O openssl-3.3.1.tar.gz

# zlib: 1.3.1
wget https://zlib.net/zlib-1.3.1.tar.gz -O zlib-1.3.1.tar.gz

# nginx_upstream_check_module: v0.4.0
wget https://github.com/yaoweibin/nginx_upstream_check_module/archive/refs/tags/v0.4.0.tar.gz -O nginx-upstream-check-v0.4.0.tar.gz
如果无法直接通过wget下载依赖包,可手动逐个下载所需依赖,将其放置到/opt/nginx_src目录:
Nginx,下载stable version,1.26.2或者以上版本(建议选择较高版本,以减少安全漏洞):https://nginx.org/en/download.html
nginx-sticky-module,下载链接:https://bitbucket.org/nginx-goodies/nginx-sticky-module-ng/downloads/
pcre,下载链接:https://sourceforge.net/projects/pcre/files/pcre/
openssl,下载链接:https://www.openssl.org/source/
zlib,下载链接:https://zlib.net/
nginx_upstream_check_module 下载链接:https://github.com/yaoweibin/nginx_upstream_check_module/tags
3. 解压
cd /opt/nginx_src
tar -zvxf nginx-1.26.3.tar.gz
tar -zvxf nginx-sticky-1.2.6.tar.gz
tar -zvxf pcre-8.45.tar.gz
tar -zvxf openssl-3.3.1.tar.gz
tar -zvxf zlib-1.3.1.tar.gz
tar -zvxf nginx-upstream-check-v0.4.0.tar.gz

# 重命名sticky依赖(简短些方便后面写路径)
mv nginx-sticky-module-ng-1.2.6  nginx-sticky-1.2.6
4. 更新补丁包
注意参考github选择对应nginx的版本,当前 nginx-1.26.3 使用 1.20.1 的补丁
# 进入nginx源码目录
cd /opt/nginx_src/nginx-1.26.3/
patch -p1 < /opt/nginx_src/nginx_upstream_check_module-0.4.0/check_1.20.1+.patch

# 注意 如果需要同时编译sticky模块,sticky模块也需要打健康检测的补丁
# 进入sticky源码目录
cd /opt/nginx_src/nginx-sticky-1.2.6/
patch -p0 < /opt/nginx_src/nginx_upstream_check_module-0.4.0/nginx-sticky-module.patch
5. 修改nginx-sticky模块源码 (解决编译过程报错问题)
在编译安装前,先执行如下命令修改nginx-sticky模块源码,避免编译过程报错:
sed -i "s/ngx_http_parse_multi_header_lines.*/ngx_http_parse_multi_header_lines(r, r->headers_in.cookie, \&iphp->sticky_conf->cookie_name, \&route) != NULL){/g" /opt/nginx_src/nginx-sticky-1.2.6/ngx_http_sticky_module.c

sed -i '12a #include <openssl/sha.h>' /opt/nginx_src/nginx-sticky-1.2.6/ngx_http_sticky_misc.c
sed -i '12a #include <openssl/md5.h>' /opt/nginx_src/nginx-sticky-1.2.6/ngx_http_sticky_misc.c
如未修改源码,会遇到如下报错:ngx_http_sticky_module.c: error: 'ngx_http_headers_in_t' has no member named 'cookies'
 编辑
编辑
ngx_http_sticky_misc.c:152:15: error: ‘MD5_DIGEST_LENGTH’ undeclared (first use in this function)
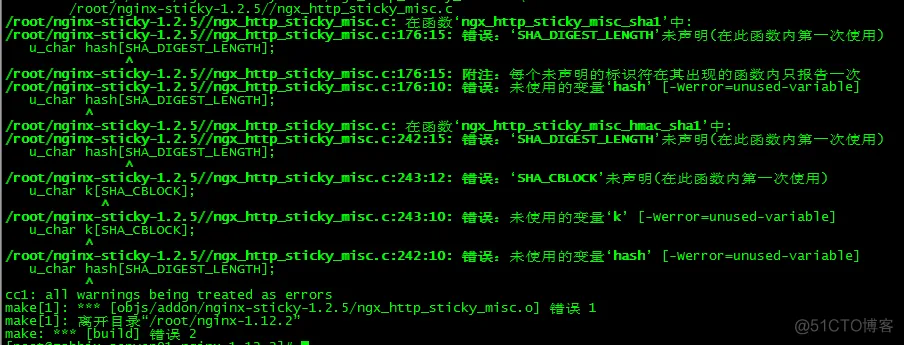 编辑6. 开始正式编译ngnix
cd /opt/nginx_src/nginx-1.26.3

# 配置编译环境
# 编译参数 --prefix=/usr/local/nginx-1.26.3 指定把nginx安装到 /opt/nginx-1.26.3 目录,可自行修改
./configure --prefix=/usr/local/nginx-1.26.3 --with-http_stub_status_module --with-http_ssl_module --with-http_realip_module --with-http_sub_module --with-http_flv_module --with-http_mp4_module --with-http_auth_request_module --with-http_random_index_module  --with-http_gzip_static_module --with-pcre=/opt/nginx_src/pcre-8.45 --add-module=/opt/nginx_src/nginx-sticky-1.2.6 --with-openssl=/opt/nginx_src/openssl-3.3.1 --with-zlib=/opt/nginx_src/zlib-1.3.1 --add-module=/opt/nginx_src/nginx_upstream_check_module-0.4.0 --with-stream

# 上一步./configure命令完成没有报错后,再依次执行如下命令
# 编译源码
make
# 安装
make install
7. 安装完成
 编辑
编辑
三、 nginx的管理
启动:
# 切换到ng程序目录sbin
cd /opt/nginx-1.26.3/sbin
# 启动
./nginx
重启:
# 切换到ng程序目录sbin
cd /opt/nginx-1.26.3/sbin
# 重启
./nginx -s reload
停止:
# 切换到ng程序目录sbin
cd /opt/nginx-1.26.3/sbin
# 停止
./nginx -s stop
指定配置文件重启,一般用于nginx异常停止后的启动:
# 切换到ng程序目录sbin
cd /opt/nginx-1.26.3/sbin
# 指定配置文件重启,一般用于nginx异常停止后的启动
./nginx -c /home/nginx/conf/nginx.conf